

Post by nigel on May 6, 2005 4:54:01 GMT -5
Camera Dolly Design
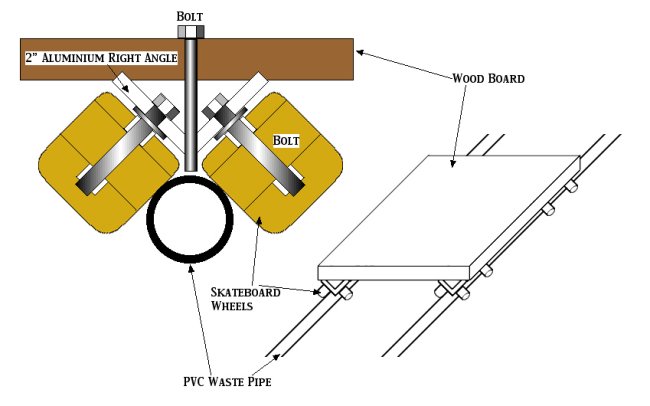
The diagram below should give you a rough idea on how to construct a home-made camera dolly. Please note that measurements have not been included because they depend upon what materials you are able to obtain. My tip is to build the thing around the wheels; skateboard wheels come in different sizes so get your wheels and adjust the measurements around them.
Notes:
Use PVC waste pipe as your rails. I use more pipe of a smaller diameter to go inside to connect the lengths. I sawed my lengths into 2 metre (ish) long sections so that they would fit into my car for easier transportation.
Bear in mind that the wooden board must hold the weight of the camera, the tripod and the camera operator. Another person is required to push the dolly along. I ran the aluminium right angle for the whole length underneath the board for added strength. This makes it heavier but also more stable.
The plastic skateboard wheels rolling on the plastic pipe can give a hard ride. This can lead to very juddery images. Try cladding the pipe or coating the wheels with something soft to reduce this.
I drilled three holes in the board for the feet of my tripod to fit into. This meant that when I disagreeistant began pushing the dolly the tripod came as well. If you're not careful the tripod could fall off when you begin moving and hurt your camera.
Tips on Filming with the Dolly:
Once you have laid your rails, run the dolly, unburdened, along them back and forth a few times. The dolly requires at least two people to operate (1 to push or pull, the other to stand on top and operate the camera).
Give the dolly plenty of room to gather speed before it reaches the point at which you want the shot to begin, i.e.; use more length of rail than the shot requires, start right at the start and continue right to the end. This means that when you are filming by the middle point of the rails your speed is constant and there should be no jerky movement.
Bear in mind that when you pan the camera as you track (i.e.. twist the camera to frame the action on the tripod as you move the dolly sideways) most of the tracking effect is lost. The longer your rails (the longer, in time, your shot) the less this happens.
Setting up the dolly for the shot takes time. Get your assistant to do it while you rehearse your actors. Before your first take, take note of the point along the rails that you want your actors to begin, the point along the rails at which the camera frames them correctly. Mark this point or have someone cue them in when you reach it. Otherwise you might find the action finished before the camera gets there.