|
|
Post by nigel on Oct 12, 2005 17:06:30 GMT -5
There are a lot of answers to this question.
I think by buying all the equipment would make you a good films renting company if you wanted money. What equipments great now will be obsolet in 18months so that would cost you a bomb to buy everything inless your rich. Coming from me i'd prefer a skilled/well equipt sound man/dp to a ok gaffer & DP & etc (jack of all trades). Depending on how gd you are people will pay through the nose for someone whos well skill imagine Alien if James hired a guy who did SFX and lighting and lighting it wouldnt have been as gd of a film, so i'd stick to one that you enjoy. If your making a film people with equipment will come so you dont even need to hire. Ive had loads of people with the latest 3CCD to DAT records thousends of pounds worth of equipment and all they wanted was a credit, a meal (beans), a bed (floor), and a tenner (fiver). LOL. So advertise and they will come. Keep the money. All the best Nigel.
|
|
|
|
Post by nigel on Jun 14, 2005 18:11:21 GMT -5
Steps (can't afford film school?)
by Peter John Ross
I couldn’t afford film school. That costs money. In some cases, USC, UCLA, and NYU – a LOT of money. There is a lot to be learned in film school. There is also a lot to be learned on your own. Going to film school does not guarantee you a job, but the networking, relationships, equipment, and the creative environment has a value that can’t be measured.
So what about us wannabe’s with no way in? Are we doomed? People like Kevin Smith (dropout), and Quentin Tarantino exist on the mythology of their not liking film schools. There is the famous quote of James Cameron’s (later ripped off in the movie Good Will Hunting) where he was quoted as saying “I got a $150,000 film school education for a $1.50 in late fees at the public library. “
Okay, that’s great but what about us that don’t do so good with the book reading. Well, as was once told to me by the great Richard Linklater – “buy a camcorder and make a movie.” Today’s digital video and computers allow for a pretty amazing amount of learning to be had for very little money.
Wanna be a feature film director? Even without film school, you’ve got to learn your craft.
What often happens to overly ambitious people on their first projects is they overshoot their abilities. They try to make a movie that they don’t have the skills for (yet). When the final product is a disappointment, they quit, or get discouraged. Filmmaking is an art, not unlike being a musician. When someone sets out to make their first movie & expect to be Mozart the first time out, it probably AIN’T gonna happen (but could, anything is possible). Practice. Here’s a cheap set of things to try, to make your own self imposed Film School… it’s just a set of options, not an absolute.
A. NEWBIES – Never made a movie before? Start small. Come up with an idea something short. Now when I say short, I don’t mean 30 minutes, or even 10 minutes, but more like 1-2 minutes. Learn how to effectively tell a short story, much like verbally telling a joke if it’s a comedy, or just a moment in time. Even a dramatic “scene” that’s brief.
Shoot on video. Save $$$. Edit on whatever software you have either for free or very cheap. You probably don’t want to shoot on film your first time out. Film is expensive and you will definitely make mistakes, so why make them expensive mistakes? As was said to me by Richard Linklater – which is more important to you – owning film stock or telling a story?
Finish the short. It can’t possibly be too much work to finish a 1-3 minute short (that’s why you start this small).
There’s something to be said about accomplishing something, no matter how small. It’s positive re-enforcement. Get used to finishing your projects. It’s a good habit to get into, as it will be the difference between those that make a career of it and those that dream about it and do nothing to make it happen.
Show your first piece to a lot of people. Get feedback. Get it from film people, non-film people, but make sure to expand beyond your family and friends. They may have an opinion they withhold because of your feelings. You’ll never learn anything that way. You can always put your movie online for people to see and get brutal, yet honest feedback. Not everyone will like your movie, get used to it as early as possible.
Since digital video is cheap, make several of these. Think of them as exercises. Set goals for each movie and try to achieve them. Learn by doing. Tape is cheap. Waste as much as you need to, but learn as much as you can.
B. SOPHMORE MOVIE - Get bigger. Challenge yourself on the next project. Make this one longer. Maybe try moving the camera more, or make the scenes more complicated. Work with more experienced actors. For myself, I won’t do a project unless I can learn something new and there’s ALWAYS something to learn. Whether it be how to edit on a moving dolly shot, learning a new aspect of framing and why, finding out what an ASA rating is, or anything I don’t know.
So maybe a 3-10 minute long movie with several scenes, multiple characters. If you want to step up to film, an option is Super 8mm film. It’s pretty inexpensive, but still exponentially more pricey than $4 for a 63 minute tape. You can start learning the process of synching separately recorded audio, the basics of film developing, telecine transfer, and simple film stock/lighting choices.
Start working with more people. Bring in a separate cameraperson. Work with a separate editor, even if it’s someone with less experience than yourself. Delegating is what will happen on bigger productions, so it’s better to start learning how to do this, regardless of what Robert Rodrieguz says. RR is very inspirational, but it’s very hard to pull off what he has in the studio system (but not impossible).
C. THE LONGER SHORT FORM – feel pretty good about the movies you’ve already made? Mastered the basic of scenes and simple storytelling? Now try something a lot more complex. Try keeping the attention of an audience for 20-45 minutes.
Creating compelling characters, shooting and editing them in such a way that an audience cares about what your plot does to them – this is what we’re all trying to do. If you skipped the first two parts, how exactly are you expecting to do this? Well – some people CAN. Some of you have a gift and can exert it. I can give several examples of first time filmmakers that came out of the gate with amazing filmmaking skills (Steven Spielberg, Robert Rodrieguz, Sam Mendes, Joel/Ethan Coen, and many more).
Shooting on film can be expensive. If you’ve practiced enough on video, you may have picked up a bad habit of shooting a lot more than you need. When shooting on film, you have to be conscious of the budget, so your shooting ratio will be much lower than video. A good thing to learn early on is how to shoot what you need, without compromising your options. Shooting on video often means shooting a lot more coverage than you will ever use. Do you really need a close up of every single extra in a scene? On video, it’s a few minutes of shooting, and 1/3rd of a $.01 worth of tape. On film, it’s extra lighting setups, $.30 a foot for film & processing, and $50 for the 15 minutes of telecine time to look at it and decide you’re never gonna use it. Learning to be conservative with film & coverage on a short will be less expensive than running out of money on your first feature.
At this stage, there’s a whole other can of worms to consider. Film Festivals, promotion, and marketing. Things relating to the “business” half of “Movie Business” become important when you want to be a professional. Getting your work seen and building relationships that will further your filmmaking career aren’t going to happen by themselves. A limo won’t be en route to your front door just because you made a movie. It actually has to get seen by the right people at the right place at the right time.
Learn by doing. These are just options that just about anyone can try. There are plenty of great books out there, but it’s all theory until you actually get off the couch and do it for yourself. Not being able to afford Film School is a cop out. Go make your movies.
|
|
|
|
Post by nigel on Oct 18, 2005 9:21:21 GMT -5
heres the trailer for rising evil plz watch and tell me what u think. Then pre order lol  www.ngmfilms.com www.ngmfilms.com |
|
|
|
Post by nigel on May 14, 2005 12:23:28 GMT -5
|
|
|
|
Post by nigel on May 11, 2005 5:34:06 GMT -5
How to make compressed gas bullet hits This method uses the force of compressed air to blast fake blood from a length of tubing. Simple! What you'll need... A pump-up insecticide sprayer - Its worth investing in a new one as a used sprayer might have some insecticide in and you don't want to kill yourself off before you get to shoot your movie. Garden Hose - You probably need about 2 metres which you might be able to chop off your normal house. Failing that getting a good length to cut up is useful as you can experiment with different lengths for different purposes. Fake Blood - For a whole bunch of recipes try Eejit's Guide to Blood. For the example below we used Cardiff Red. Gaffer Tape - You would think I have a deal with the company cos I talk about this stuff so much. It is useful though. Sponge - You'll need to rip it into little pieces so buy a cheap car sponge. Blu-tak - Y'know the putty type stuff used to stick up posters. Old Shirt Step One - Cut approx. a 2 metre length from your garden hose reel. About an inch up from one end you need to make a hole big enough to put your little finger in. This is where the blood will be ejected from. We used a heated screwdriver to melt through the hose as it was pretty tough. Probably not recommended though as it gave off these awful fumes. Best to do it in a well ventilated place so you don't pass out.  Step Two - Bung up the end you have made the extra hole in using Blu-Tak. By forcing the blood to fly out of the extra hole instead of the end of the tube it sprays out rather than jets out.  Step Three - Unscrew the spray nozzle from the insecticide sprayer. Attach the unmodified end of the tube to the empty sprayer. Now to work on your biceps! Give the sprayer about 150 pumps. The first 100 or so should be easy but by the end it should start getting more difficult. All this energy is being stored as pressure and when you push the trigger all the energy will be released at once, blasting the blood out.  Step Four - Gently pour in about 20ml of your fake blood to the modified end of the hose. You may need to thin the blood mixture with water to make it less 'gloopy' (err...that sounds technical). Bung up the side hole with pieces of sponge. Ideally use red sponge as this will fly out when you trigger the sprayer looking like chunks of flesh. Mmm...nice!   Step Five - Make a hole in the back of the shirt and feed the tube over the actor's shoulder and down to the area that is going to be 'shot'. Tape the tube in place at the front with the side hole facing forwards.   MOST IMPORTANT BIT!!! Have the actor get down on his knees and get an assistant to hold the sprayer as high as possible for 30 seconds. This allows the blood to run down and prime the tube. The blood should now all be in the last part of the tube held back by the bits of sponge. Step Six - The shirt here has been prepared by scoring with a knife. The side hole of the hose should be lined up with the hole in the shirt. Use gaffer tape on the inside of the shirt to close the shirt up. Step Seven - Have the assistant who will fire the trigger, out of camera shot on the ground. Here stuntman Stephen demonstrates what the setup would look like if it wasn't concealed underneath the shirt. When positioning the camera be careful. The force was so powerful on one of the tests we ended up showering the camera operator with blood. If you are straight on get a good distance away and zoom in. Step Eight - Push the trigger!! Ker-BLAM!! Blood flies everywhere. Gore City OK, that's probably enough to get this page an 18 certificate! But funnily enough its not what you see that makes the effect so gory. In truth there is probably only one or two frames where you can see a flash of red spray. If you pay attention whilst watching some action movies you'll notice the same thing. Most bullet hits are one frame wonders, barely enough for the eye to register. So what makes these effects so shocking? Turn the volume down and watch the clips again - not so effective huh? There's two reasons for this : 1) Sound is 80% of the effect - It's the bang, crunch and splat that make the effect work. Most of the clips above had had their sound tweaked (using Adobe Premiere). The original sound for the squib movie has explosions that sound like 'pops', they were lowered as the clip was slowed down and become more effective. The compressed air hit had an extra sound of a slowed down and distorted hand clap added to it to beef up the hit. Finally the compressed air head hit had a gun shot and splat added from a copyright-free sound effects CD (the bizarre 'Totally Gross Sound F/X from Hell'). All of the above methods work to increase the shock value. 2) They need to be in a dramatic context - OK, so we've been talking about how to achieve the effect, but this is wasted if they are overused in a film. Repeat the same images again and again and they lose their potency. By watching these clips to see how they are achieved you probably no longer find them so shocking - you've become desensitized to them. To be effective in a film they have work dramatically - we have to care about the character who gets shot, there needs to be a tension in the air before the gun goes off, or it needs to suprise us by happening when we least expect it. We don't always need to see the hit itself, sometime only the effects of the hit (the spray of blood on the car windshield) or the sound of the gun (whilst cutting to a wideshot of a building) can be just as disturbing. Don't believe me? Seen a Tarantino movie lately? Finally a word of warning - whatever you are using to make your effects be careful. Your cast and crew's safety is vital. Not only that make sure that everyone around you knows what you are doing. We were shooting a bank siege. There were a couple of police cars and van, extras as an armed response team and our lead actor in the middle of all this toting a pair of handguns. A couple of squibs later and he was lying on the floor in a pool of fake blood. Unfortunately this was so realistic that we later discovered that a member of the public had made a complaint when they discovered it was a film we were shooting. They hadn't entered the building as they believed it was for real! Big-budget effects at low-budget prices! Now you know how its done. So next time you shoot your video, shoot your actors as well. So to speak. |
|
|
|
Post by nigel on May 11, 2005 5:00:18 GMT -5
What were you doing on 13th May 1986? Well, in preparation for Knightmare, some experiments with Chroma Key (blue screen technology) took place in the Anglia TV's Studio A. Now uncovered from the archives - you can see a video clip of this never seen on TV experiment. There were two identical blue screen rooms, each with three walls and no ceiling. They were built adjacent to each other in the centre of Anglia TV's large Studio E on Magdalen Street in Norwich. The area for the helpers was set up in the corner of the same studio. Mostly, the right-hand blue room was used for superimposing the dungeoneer onto the background, while the left-hand room was used for live close-ups of hand-operated puppets such as the dragon's head, and the flying dragon. The right-hand room used a luminescence-sensitive Chroma Key system, so live shadows which were cast affected the brightness of the superimposed dungeon graphics. The room was reasonably consistently lit; any variations in brightness of the walls was transferred to the graphics, but this didn't usually matter as it was quite subtle and the shape of the real/virtual rooms typically matched up anyway. Clip available in 'Other Clips' www.knightmare.com/clips/index.htmSome screen-shots from this clip follow:   The man walks around a room carrying a lamp, then putting it on top a well. He then wanders around a corridor and interestingly the camera moves up and down and zooms back to reveal the part of the studio in front of the blue room. Other production staff can be seen moving things out of the way!   He is then shown wandering around a different room, checking out the doors etc, then talking the cover off the well and standing in it.   Then he returns to the same room with a helmet on and sword in hand, and wondering around the room. One of the production staff in the background says "Heh, keep this for the Christmas tape!" (Every Christmas, a competition is held whereby each ITV company would produce a collection of funny clips from their programmes to see which is the best!). A close-up of the top of the well is then shown as he places the sword on it. And finally, this is probably the best bit. A wall monster is projected into the screen (of which the face of it is taken from a camera focused on the puppet on top the well). He then tries poking at its nose, and then walks up to it to swipe it with his sword. The monster keeps appearing and disappearing from view.  Interesting, wasn't it? Now you know how the wall monsters were done! |
|
|
|
Post by nigel on May 6, 2005 9:30:03 GMT -5
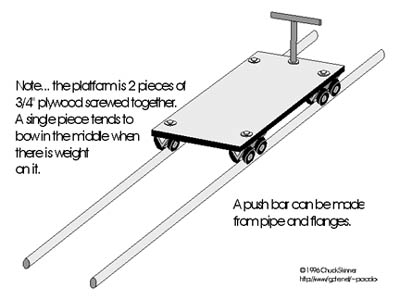 Skateboard Dolly This is a skateboard dolly design drawn out by a cinematopher named Chuck Skinner. We created our dolly with this concept. Getting the materials: The wood is not too expensive to buy at a Home Depot, but if you're on a tight budget, remember that wood is everywhere. We found our wood in our sister's garage. Just ask around. The skateboard wheels should be purchased new. These determine the smoothness of the motion. Trust us, it's worth it. However, just because you're buying new doesn't mean you have to pay full price. When we were shopping for our wheels, we called around several skateboard shops explaining to them what we were doing: "Hi, I'm an independent filmmaker trying to build a skateboard dolly. I don't have a lot of money, but would you be willing to give me a deal on some wheels and bearings in exchange for a credit in the movie?" There were plenty of rejections, but after several attempts, one skateboard shop gave us the wheels and bearings at cost...if we promised to have their logo somewhere in a shot. That's low-budget product placement, kids! 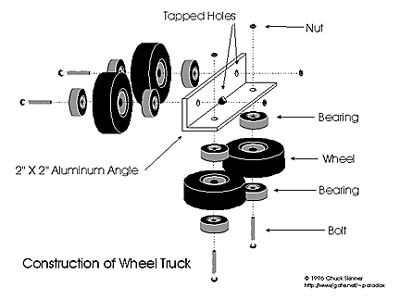 Building it: Make sure you make it small enough to be able to roll through a door. Also, make sure the push bar material is something that doesn't make a lot of noise. 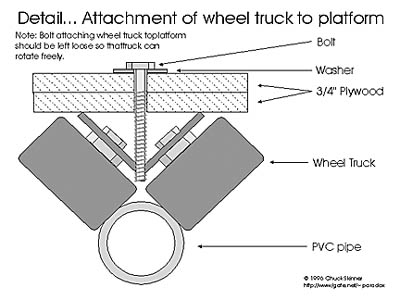 |
|
|
|
Post by nigel on May 6, 2005 9:27:03 GMT -5
 Blood Packs You ever wanna shoot someone...on film? If you've looked into buying squibs for your low-budget film, you've probably figured out you don't just go to the local convenience store and buy a 12-pack of movie blood packs. We've found that they're a little pricey and they require a certified special effects professional to purchase them, and rightfully so. They are dangerous and require professional attention. But years ago, we found a way around the expenses and rules. We created our own blood packs that were a fraction of the cost of real ones. DISCLAIMER: SAFETY FIRST!!! When we first experimented with these, we made a lot painful mistakes (Viet still has a scar on his chest). Luckily, we were young enough to recover. Please don't be jackasses like us. Be responsible and keep in mind that this is just a crazy, stupid way to make blood packs. If you do decide to try it this way, don't say we didn't warn you. Materials: Fake Blood Condom Cardboard Duct tape Black cat (firecracker) OPTIONAL: • Bottle rocket igniter, battery Getting the materials: Fake blood is everywhere. You can experiment on your own (no, ketchup doesn't look good), buy it at special effect shops, or try Foreign Image's specially made fake blood (this is probably your best option). Condoms. They can be EXPENSIVE at the store, but as desperate, poor filmmakers, we again found a way around the costs. Just do this. Walk into the Planned Parenthood center of your town and confidently ask for 100 condoms. They literally cost pennies if you buy them there. After paying about 10 bucks for the 100 condoms, wink to the receptionist and say, "Thanks. I'll be back tomorrow for more." Cardboard. Go to any store and ask for their old boxes. Our local Blockbuster knows us by name now. Steps: 1. After making several hundred stupid condom jokes, wash off all the lubricant. If you keep it oily, it can keep the black cat from igniting. 2. Fill the condom about 1/4 full. One note, too much blood is always better than too little. 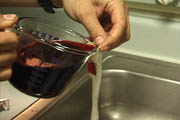 3. Tie knots on both sides of the condom. This will allow the blood to be compressed for a better explosion. 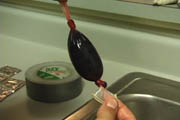 4. Tie the condom around at least THREE LAYERS of cardboard. For obvious reasons, more cardboard is better than less. We've found that three layers is plenty. 5. Duct tape down the condom to the cardboard. Since the lubricant is off the condom, the duct tape should stick pretty well. 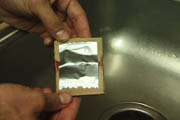 6. Insert the black cat between the bloodfilled condom and the cardboard. 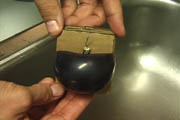 The shot: We usually tape the blood pack onto the actor's body, light the black cat, and run out of the shot. In the several dozen times we've used this method over the last 7 years, we've never had the lighter in the shot by the time the black cat went off. We've also connected the black cat to a bottle rocket igniter. Through wiring from the igniter to a battery, the black cat will explode with an electric charge. We personally think it's time consuming, not very reliable, and a bit expensive (three igniters cost a few dollars). Notes: Aside from our initial experimenting, we're proud to say no one has ever been hurt with our homemade blood packs in the last 7 years. Be sure to have earplugs for the actors. There may be a little smoke from the fuse of the firecracker, but it's never really effected our shots. Pros: You have pretty good looking blood hits for very cheap. Cons: You can't control exactly when the blood pack will explode. |
|
|
|
Post by nigel on May 6, 2005 5:29:12 GMT -5
Good Morning Class! - Now a famous film-maker a while back said something about 'Everything you need to know about film you can learn in a week.' He was being generous. You can learn it in 10 minutes.
Set your watches we will be out of here in ten kids.
Okay, so you wanna be a film-maker? (Class choruses 'YES') Wrong! You ARE a film-maker. The moment you think about that you want to be a film-maker you're that. Make yourself a business card that says you're a film-maker, pass them out to your friends, soon as you get that over with and you've got it in your mind that you're one you'll be one, you'll start thinking like one. Don't dream about being a film-maker, you are a film-maker. Now let's get down to business.
Let's Play!! - What you need to learn is that being creative is not enough in this business. You have to become technical. Creative people are born creative - you're lucky. Technical people however can never be creative. Its something they'll never get. You can't buy it, find it, study it - you're born with it. Too many creative people don't want to learn how to be technical, so what happens? they become dependent on technical people. Become technical, you can learn that. If you're creative and technical, you're unstoppable.
Experience - Do you have experience in movies? You do, right - you WATCH movies. Now you need to have movie experience - you're not going to learn from just watching movies, you're learn some things, you'll learn more picking up a camera, making your own films, your own mistakes - mistakes don't have to be mistakes, everything is subjective - a mistake to one person is actually a piece of art to someone else. Hide behind that, tell everyone its art, you can get away a lot.
Start with a screenplay - Does anybody here know how to write? No - good. Everyone else writes the same way. Start writing your way. That makes you unique. You can take writing classes, that's good, but don't bother to go to film school or you'll be making films like everybody else. We want to see your film.
How do you write a script? - Well, you obviously don't have a lot of money or you wouldn't be in my class. So you wanna make a movie but you don't want to spend a lot. You're gonna come up with problems everyday on your set. You can get rid of the problem one of two ways - you can do it creatively or you can wash it away with the money hose. You got no money, you got no hose. So let's make a screenplay for a movie you can actually make without having to make your parents poor. Let's make a cheap movie.
How do you make a cheap movie? - Look around you, what do you have around you? Take stock in what you have. Your father owns a liquor store - make a movie about a liquor store. Do you have a dog? Make a movie about your dog. Your mom works in a nursing home, make a movie about a nursing home. When I did El Mariachi I had a turtle, I had a guitar case, I had a small town and I said I'll make a movie around that.
How do you visualise a movie? - With storyboards, you can do that. You can pre-visualise your movie and draw them out, but what you should really do is make a blank screen for yourself and watch your movie. Close your eyes and stare at this. Imagine a screen, imagine your movie. Shot for shot, cut for cut. Sit there, close your eyes and get rid of everybody, get rid of all your thoughts in your head except your movie and watch your movie. Is it too slow? Is it too fast? Is it funny? Does it make sense? Watch it and then write down what you see. Write down the shots that you see. And then just go get those shots.
Equipment - OK let's go over the equipment. The worse the better. You don't want anything too fancy, remember this is your first movie - you're not Spielberg yet. I used this one for El Mariachi, almost the same one, I used a 16M this is a 16S, this is exactly what I had. It helped me move fast because it was light, it was very noisy so I could do the sound in a wacky way, but this thing here would cost you about $2000. Don't spend that kind of money, find some monkey that owns one. I found someone who had one of these sitting around, he wasn't using it. I borrowed it from him, I shot my movie.
(Points at what look's like a d**n heavy tripod) Look at it, this is a nice stand, its a very solid stand, y'know what's gonna happen? The camera is gonna stay on the stand, you're just gonna keep it there, 'cos its so nice, meaning your movie's gonna look...stiff. Take it off of there, sit in a wheelchair, push yourself around, get some energy in your film. That's the great thing about first films is that they have so much life and so much energy. Big productions can't even duplicate that energy, because they've got too good a stand and too much crew and everything is really smooth and polished and its lifeless. Add life to your film by getting rid of the fancy stuff. (Points at the tripods) Too good, too heavy, too good - just use your hands.
Here's a light meter, this isn't the write one, I broke my other one. This is a spot meter, that's OK but it's too fancy. You just need one with a little white dome on it, point it to your subject, read the light, look at the number on your light meter - remember your light meter is your friend - feed that into lens and the iris, and then you're set. Start shooting.
Don't over light - On Mariachi I had two lights, regular light bulbs, they were balanced for indoor film, so look fine. In fact everyone said the lighting looked moody because there was very little light . Your mistakes, your shortcomings suddenly becomes artistic expression.
Finally, postproduction - When you've finished shooting your movie what do you do? (Picks up video mixer) These are your friends my friends. Video editing systems, computer editing systems, anything like that, its immediate, its easy, its cheap. Do not cut on film. Film is your enemy. You may be shooting on film but don't cut on film. If any of you want to cut on film get out of my class right now. Go spend $20,000 on a real film school and do that. You'll never get a job though - believe me.
Everything is on computers or video these days. Film is slow, film is expensive, film is not creative - film take's too long. Cut on tape that's what I do. I shot Mariachi for nothing. I edited on video. I had a three-quarter inch master that looked beautiful because the negative was transferred right to tape. There was no middleman so it looked like 35mm - clean, pristine. I made VHS copies of this, sent them out all over Hollywood. I never made a film print. (Picks up film strip) Waste of money. You have to string them up, they get worn out. They're expensive. They're copies of your negative. You don't want that, you don't want copies of your negative, you want your negative...on tape. Where people can duplicate it and watch it and get you work.
OK so you've made your movie, you've cut it, you've got it out, people want you. What do you do? The first thing you want to do is get an agent - right away. Hollywood is full of sharks, you need a shark working for you. These guys go and get you the best deals, they get you the best prices, they get you the best movies.
What you've learnt is what no one else has. How to make a movie dirt cheap. No one else in Hollywood knows how to do that. You guys can make them cheap, you guys can make them better, don't get swallowed in the system, take advantage of your position.
Now I make movies that are still low budget but they look like big budget movies because I learnt the techniques that I just showed you today.
All right I've got to go back and do my own films so I hope you guys learnt something today, I hope you grab some of these cameras and go shoot something of your own, I hope you write down the ideas that you have, the dreams that you have.
Stop aspiring, start doing.
See you in Hollywood - be scary!
|
|
|
|
Post by nigel on May 6, 2005 5:14:46 GMT -5
Materials :
old saucepan
oven
baking thermometer
2 measures of water
1 measure of golden syrup
3 1/2 measures of sugar
Steps :
Mix the water, golden syrup and sugar together in the saucepan and bring it to a boil on the oven.
Leave it boiling until the mixture is thick, with almost all the water boiled off.
Pour it into whatever mould you're using and let it cool.
Notes :
Keep it out of moist areas and direct sun.
Sugar glass doesn't last long (warps or goes sticky) so make it close to the time when you plan to use it.
Though only sugar, the glass can have sharp edges/points when broken, so be careful when handling.
|
|
|
|
Post by nigel on May 6, 2005 5:13:50 GMT -5
WHITE BALANCE
I don't really know much about the technical side of white balance but if you can adjust it on your camera then there are times when it will be useful. Basically white balance is used to compensate for different lighting conditions. There are usually a number of settings including 'indoor' and 'outdoor'. The tweaking of white balance is useful if you are filming an object against a bright background (i.e. bright sky). Without white balance adjustment your subject can appear very dark against the background. In reality you should avoid filming in extreme lighting conditions (either too dark or too light) because the quality of your footage could be affected.
AUTO FOCUS
Most cameras have auto focus and sometimes this can turned off. Most of the time it is advisable to let the camera do the hard work ! Occasionally auto focus can have problems. It can result in a blurred image if the subject matter is constantly moving or has changing brightness. Problems are most likely to occur when filming objects that are within 100 or so cm of the camera. This is why it is important to review your footage on a TV frequently as problems such as focus may not be apparent on the camcorder screen.
ZOOM
Most camcorders have a zoom function and when you make a film you will be tempted to use it. You will probably be tempted to use it a lot. It makes you feel like a 'real' cameraman so it has an understandable attraction. The trouble is 'zoom' can cause big problems : Zoom amplifies camera shake and encourages you to distance the camera from the subject. This will trash your soundtrack. Sound quality is a problem on its own without you making things worse by filming everything at a distance. Zoom causes focus problems. As the camera zooms the auto focus often struggles to keep up. This can result in blurred patches during the zoom sequence. Don't use it and you will avoid a lot of problems later on. If you do use it then be very careful and consider all the pit falls. Did we use 'zoom'?? Of course we did but usually we also filmed a non-zoom version of the same scene so that we had the choice of two versions during editing. It was usually the 'zoom' version that got the chop. It is just hard to pull off a good zoom shot.
DIGITAL EFFECTS
These days camcorders are loading with digital effects. This include 'black and white', 'fade', 'digital zoom', 'slow motion', 'pixelate', 'mirror' etc If you are going to be editing on your computer then these effects are useless. A camcorder can do nothing that you can't do on your PC. If use an effect on your camera then you are stuff with it. If you leave the effects until the editing stage then you have got far more opti1ons to explore. My advice : forget about camera digital effects. They are gimmicks. Film raw footage and mess about with it later.
|
|
|
|
Post by nigel on May 6, 2005 4:54:01 GMT -5
Camera Dolly Design The diagram below should give you a rough idea on how to construct a home-made camera dolly. Please note that measurements have not been included because they depend upon what materials you are able to obtain. My tip is to build the thing around the wheels; skateboard wheels come in different sizes so get your wheels and adjust the measurements around them. 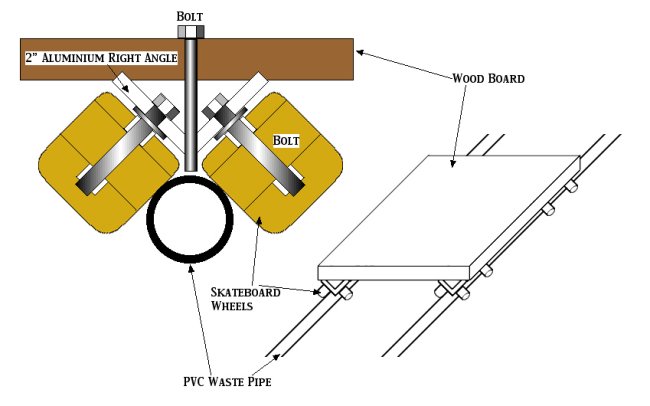 Notes: Use PVC waste pipe as your rails. I use more pipe of a smaller diameter to go inside to connect the lengths. I sawed my lengths into 2 metre (ish) long sections so that they would fit into my car for easier transportation. Bear in mind that the wooden board must hold the weight of the camera, the tripod and the camera operator. Another person is required to push the dolly along. I ran the aluminium right angle for the whole length underneath the board for added strength. This makes it heavier but also more stable. The plastic skateboard wheels rolling on the plastic pipe can give a hard ride. This can lead to very juddery images. Try cladding the pipe or coating the wheels with something soft to reduce this. I drilled three holes in the board for the feet of my tripod to fit into. This meant that when I disagreeistant began pushing the dolly the tripod came as well. If you're not careful the tripod could fall off when you begin moving and hurt your camera. Tips on Filming with the Dolly: Once you have laid your rails, run the dolly, unburdened, along them back and forth a few times. The dolly requires at least two people to operate (1 to push or pull, the other to stand on top and operate the camera). Give the dolly plenty of room to gather speed before it reaches the point at which you want the shot to begin, i.e.; use more length of rail than the shot requires, start right at the start and continue right to the end. This means that when you are filming by the middle point of the rails your speed is constant and there should be no jerky movement. Bear in mind that when you pan the camera as you track (i.e.. twist the camera to frame the action on the tripod as you move the dolly sideways) most of the tracking effect is lost. The longer your rails (the longer, in time, your shot) the less this happens. Setting up the dolly for the shot takes time. Get your assistant to do it while you rehearse your actors. Before your first take, take note of the point along the rails that you want your actors to begin, the point along the rails at which the camera frames them correctly. Mark this point or have someone cue them in when you reach it. Otherwise you might find the action finished before the camera gets there. |
|
|
|
Post by nigel on May 6, 2005 4:51:39 GMT -5
Making a Lens Hood for your Camcorder For some unknown reason I could NOT buy a simple lens hood for my camcorder and decided that I would be charged a small fortune for it if I eventually found one!! Heres how to make one for almost nothing!!! Find yourself a small plastic bottle with a top that is around the size of your camera's UV filter Now figure out how long you want your hood to be and simply cut off the base of the bottle with a sharp hobby knife and then trim the top section as well to eliminate all but a few millimetres of the original top of the bottle. Mount your UV filter in the cut off top and fix it with a few drops of super glue. Before applying the glue, FIRST screw the UV Filter onto your camcorder and screw it up finger tight so when you glue on the lens hood and screw the whole fitting back on, the hood will be horizontal. Before you rush out and make your new lens hood look pretty, use some sticky tape to fix it to the filter for now, turn on your camcorder and zoom out to the camcorder's full wide position. Take a peek in the viewfinder and ensure that the lens is not "seeing" the edge of the hood. If it is, then just trim it off until it's clear.  Finally you can give it a quick coat of matt black paint to make sure that there are no nasty internal reflections and you are done  Total Cost ?? Free!!! (if you happen to find a bottle in the kitchen and have some paint) Otherwise pretty minimal and you can make it in under 5 minutes!!! |
|
|
|
Post by nigel on May 6, 2005 4:47:45 GMT -5
Explanation The Skypod is a ~6 foot boom that attaches to a standard camera tripod and holds a camera about nine feet in the air, pointing straight down. The boom extends several feet horizontally, enabling the photographer or videographer to capture pictures of a floor or table surface. I designed the Skypod so that I could take overhead video of the 2001 Icehouse tournament. Here are some video tests I performed that show the effectiveness of the Skypod, with the camera at different zoom levels: 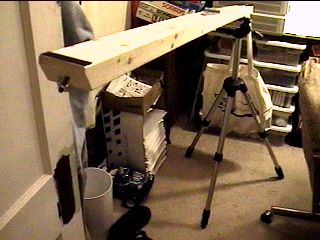 The arm of the Skypod is about six feet of 2x3 stud. I used 2x4 in a prototype, but figured this would be a little lighter. The camera end of the arm is cut at 45 degrees, and has a hanger bolt driven perpendicular to that angled surface. When the arm is angled up at 45 degrees, this hanger bolt is horizontal. There's a wing nut on the hanger bolt that I use as a lock nut when the camera is mounted. 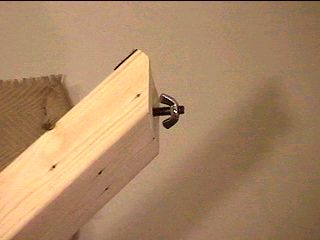 Half way down, the arm is cut through and hinged. I installed a window latch opposite the hinge so that I can lock the arm into a straight beam. The hinge is necessary so that the arm is more portable. That is, so that it can fit in the trunk of my car. 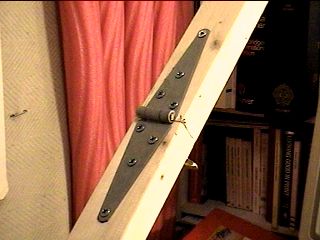  About a foot up from the bottom is the mounting plate. I drilled a hole in a quarter-inch piece of wood, then put a tee nut through the hole. Then, I glued&screwed the piece of wood to the bottom of the arm. I could have used a threaded insert, I suppose, but I didn't want to trust it to the possible angular stresses. I've had bad luck with inserts pulling out in the past. The tee nut has a quarter-inch thread, so it mates with standard photo equipment. My tripod uses those nifty new removable mounting plates, so I can change between mounting the arm on my tripod and mounting a camera on the tripod pretty easily.  At the very bottom end of the arm is a screw hook. I hang a weight off this hook to counterbalance the weight of the arm. This bag has three bricks in it currently, and truthfully, the arm is still a touch heavier. Still, it's pretty closely balanced, and all this weight right over the tripod keeps the tripod steady, so I don't need to sandbag the legs individually. 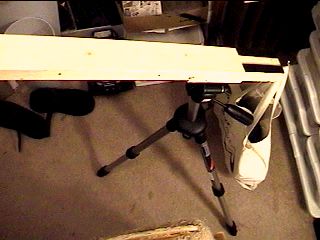 I also put some sticky-back Velcro™ on the top of the arm ends. This allows me to gaff cables in place, and keeps the ends fastened together when the arm is folded. It's very useful for holding a mini-TV that I use as a video monitor.  |
|
|
|
Post by nigel on May 6, 2005 4:41:39 GMT -5
How to make REAL sound effects
Movie studios still use Foley artists to create their ambient and special sound effects for films so there must be doing something right!! If you just can't find the right effect on the internet as a "ready-made" wav file then consider these ideas to make fx the old fashioned way!!!
Fire - Crunch cellophane wrap or wax paper
Rain - Sprinkle rice, birdseed or coarse sand on a metal sheet or other thin surface
Thunder - Flex or jiggle a large sheet of aluminum.
Broken window pane - Drop small strips of aluminium on a hard surface.
Icky slime - Squish pasta with your hands, or squirt it out of a rubber glove.
Frying - Touch wet rags to a hot surface (stove burner).
Ticking bomb - Close-mike a mechanical alarm clock.
Walking through bush - Crackle corn husks or squeeze the whisk of a straw broom.
Mechanical door - Roll a metal-wheeled skate or skateboard on concrete or metal.
Slap - Clap two thin boards together, or clap wet hands together.
Body blows - Hit a pillow or fabric sofa cushion. For a lighter sound, slap a vinyl cushion.
Horse hooves - Hit coconut shells on a hard surface or gravel.
Footfalls in snow - Step down on cornstarch or cat litter.
Footfalls in leaves - Crunch corn flakes or potato chips with your feet or hands.
Clothing rustle - Rub different types of fabrics together.
Bone Snap - Break celery to create the sound of breaking bones.
Walking on Grass - Step on tape from an unraveled audio cassette to make a convincing substitute.
Gunshots - A heavy staple gun makes the sound of gunshots.
|
|

